Edit Article
How to Make a 3D Model of the One Ring in Inventor
Ever wanted to create a 3D-model of the one ring, with the correct measurements as seen hanging on the neck of Frodo Baggins in the Lord of the Rings movies? Well, start reading already!
Ad
Steps
-
 1Press the new part (mm) and start up a new sketch. From here, make lines with measurements as seen on the image.Ad
 -
 2Exit out of the Line/Rectangle tool. Now, delete every measurement on the sketch.
 -
 3Select the Circle tool. Make a circle, having the center-point on top of the line to the very right. Make sure the edge of the circle touches the middle of the left side of the rectangle.
 -
 4Use the Trim tool (X) to remove lines. Do this until you are left with what is seen on the image.
 -
 5Re-add the length to the line seen on the image. Do this using the Dimensions tool.
 -
 6Press Finish Sketch and press the Revolve tool. For "Profile", select the area shown on the image.
 -
 7Press the Axis button and select the line to the very right. Then hit OK.
 -
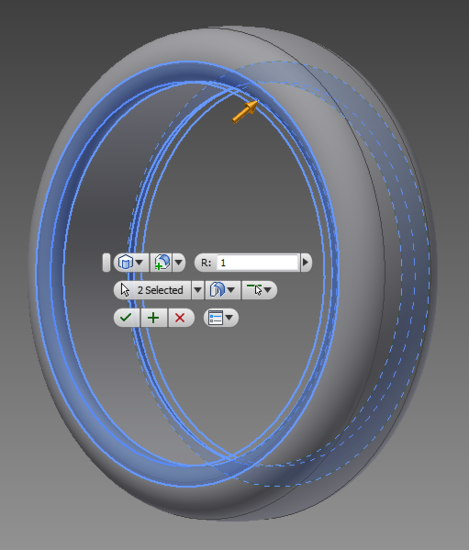
 8Select the two outer-edges of the ring. Hold Shift while pressing them. Press the little rounded edge button (Fillet) that appears and select 2 mm as the value.
 -
 9Do the same for the two inner-edges, but select 1 mm as the value.
 -
10Change the material to Gold and the appearance to "Metal 1800F Hot".
 Ad
Ad


We could really use your help!
Can you tell us about
wakeskating?
wakeskating?
Yes
No
wakeskating
how to wakeskate

Can you tell us about
product development?
product development?
Yes
No
product development
how to develop a product from start to finish

Can you tell us about
Adobe Photoshop?
Adobe Photoshop?
Yes
No
Adobe Photoshop
how to fade in Photoshop

Can you tell us about
marksmanship?
marksmanship?
Yes
No
marksmanship
how to zero a rifle scope

Thanks for helping! Please tell us everything you know about
...
Tips
- 10,35 mm is the radius that the ring has, as seen on the neck of Frodo in the films. By going to the sketch and changing the 10.35 mm line, you can now easily change the size of the ring.
Article Info
Featured Article
Categories: Featured Articles | 3D Graphics Software
Thanks to all authors for creating a page that has been read 240 times.
Did this article help you?


About this wikiHow