Origami, the Japanese art of paper-folding, dates back centuries. Origami creations range from simple and delightful to complex and astounding. Origami butterflies are an easy beginner project, making them a perfect children's activity. All you need is a piece of square paper, and with a few folds, you'll have an ethereal paper creature! Give your butterfly as a present, attach one to gift wrapping, or simply use it to brighten up a room.
Ad
Steps
Part 1 of 3: Making the Origami Boat Base
1
Start with a square piece of paper. If you are using origami paper, there is one side that is shiny and/or decorated – this is the right side. Lay the paper right-side down.
http://d5kh2btv85w9n.cloudfront.net/c/c8/Make a Butterfly Origami Step 1 Version 3.360p.mp4
A 6 x 6 inch (15 x 15 cm) square is a good size for beginners. If you want to create larger or smaller butterflies, adjust your paper size accordingly.
Ad
2
Make a horizontal valley crease. Match the paper's lower edge to the upper edge and smooth the crease with your fingers, starting from the center and working your way out. Unfold the paper so the crease remains.
http://d5kh2btv85w9n.cloudfront.net/f/f9/Make a Butterfly Origami Step 2 Version 3.360p.mp4
In the valley fold, you fold the paper over the crease, so that the sides of the paper that were facing up are now folded in on each other. The resulting crease is "under" the folded sides, hence the name "valley."
3
Make a vertical valley crease through the center. Match the right edge to the left edge and crease with your fingers, then unfold.
http://d5kh2btv85w9n.cloudfront.net/8/82/Make a Butterfly Origami Step 7 Version 3.360p.mp4
There should be four valley creases though the center: a vertical, a horizontal, and two diagonal.
8
Fold the left and right sides to meet the central vertical crease. Align the right edge of the paper with the middle vertical crease and make a fold. Repeat with the left side.
http://d5kh2btv85w9n.cloudfront.net/e/e1/Make a Butterfly Origami Step 8 Version 3.360p.mp4
Do not unfold these creases.
This is called a "gate fold."
9
Lift and slightly open the diagonal creases in the top left and right corners. Insert your thumb and middle finger under the folded corners, holding the bottom half of the paper securely in place with your other hand.
http://d5kh2btv85w9n.cloudfront.net/0/0c/Make a Butterfly Origami Step 9 Version 3.360p.mp4
10
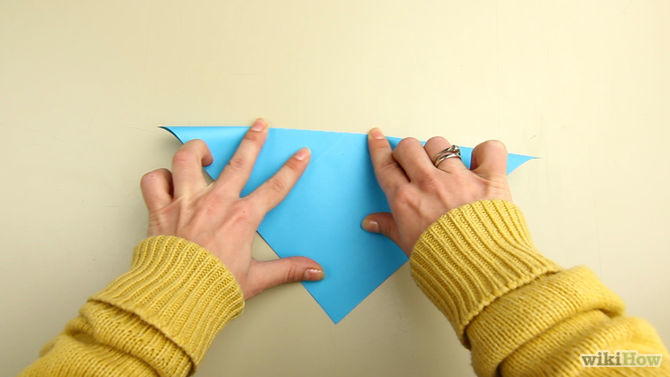
Fold the top edge down into a "roof" shape. Align the upper edge with the horizontal crease in the middle of the model. At the same time, open the flaps that you pinched in the previous step, pulling them apart and down until the top of the model meets the center crease.
http://d5kh2btv85w9n.cloudfront.net/a/a2/Make a Butterfly Origami Step 11 Version 3.360p.mp4
12
Repeat steps 7 and 8 on the upper half. When you finish, you'll have what's called an origami "boat base," a starting point for many different creations.[1]
http://d5kh2btv85w9n.cloudfront.net/a/a7/Make a Butterfly Origami Step 12 Version 3.360p.mp4
Part 2 of 3: Making the Wings
1
Flip the model over. The folded edges you made in the last step should now be face-down. The corners of the "boat" should be pointing to the sides, with the two long edges extending horizontally along the top and bottom of the model.
http://d5kh2btv85w9n.cloudfront.net/f/f3/Make a Butterfly Origami Step 14 Version 3.360p.mp4
3
Valley-fold the top right flap down. Holding the trapezoid-shaped model so the long edge is at the top (as at the end of Step 2), lift the top right corner and bring it downwards toward the model's vertical axis. Crease the fold with your fingers.
http://d5kh2btv85w9n.cloudfront.net/2/22/Make a Butterfly Origami Step 16.360p.mp4
5
Make a small valley fold in the left flap. Examine the left flap you've just folded down, noticing the mountain fold (upward-facing fold) running diagonally from the central vertical axis and ending in a side corner. Lift the side corner slightly, moving it inwards and upwards toward the center (but not all the way). Smooth the fold with your fingers.
http://d5kh2btv85w9n.cloudfront.net/a/a2/Make a Butterfly Origami Step 20.360p.mp4
Part 3 of 3: Shaping the Body
1
Make a diagonal valley fold in the upper wing. Lift the upper "wing" (which is currently extending straight out to the right) and bring it backwards (to the left), creating a fold that starts about 1/2 inch (1 cm) from the left corner of the upper edge and extends diagonally to the lower left corner of the upper flap. Crease with your fingers and then unfold.
http://d5kh2btv85w9n.cloudfront.net/7/79/Make a Butterfly Origami Step 22.360p.mp4
3
Repeat Step 1 for the other upper wing. This time, bring it up and back towards the right. Create a fold that starts 1/2 inch (1 cm) from the right corner of the upper edge and extends down and right to the lower right corner of the upper flap. Crease and unfold.
Thanks to all authors for creating a page that has been read 231,218 times.
Did this article help you?
YesNo
About this wikiHow
Reviewed by: Mohini Puranik wikiHow Crafts Team
177 votes
Helpful
231,218 views
34 Co-authors
41% of people told us that this article helped them.
This version of Make a Butterfly Origami was reviewed by Mohini Puranik on February 18, 2015. Mohini made a perfect origami butterfly by following these instructions.


About this wikiHow
Reviewed by: Mohini Puranik
wikiHow Crafts Team
This version of Make a Butterfly Origami was reviewed by Mohini Puranik on February 18, 2015. Mohini made a perfect origami butterfly by following these instructions.