Tutorial: Sign in users and call the Microsoft Graph API from an Angular single-page application (SPA) using auth code flow
In this tutorial, you'll build an Angular single-page application (SPA) that signs in users and calls the Microsoft Graph API by using the authorization code flow with PKCE. The SPA you build uses the Microsoft Authentication Library (MSAL) for Angular v2.
In this tutorial:
- Register the application in the Microsoft Entra admin center
- Create an Angular project with
npm - Add code to support user sign-in and sign-out
- Add code to call Microsoft Graph API
- Test the app
MSAL Angular v2 improves on MSAL Angular v1 by supporting the authorization code flow in the browser instead of the implicit grant flow. MSAL Angular v2 does NOT support the implicit flow.
Prerequisites
- Node.js for running a local web server.
- Visual Studio Code or other editor for modifying project files.
How the sample app works
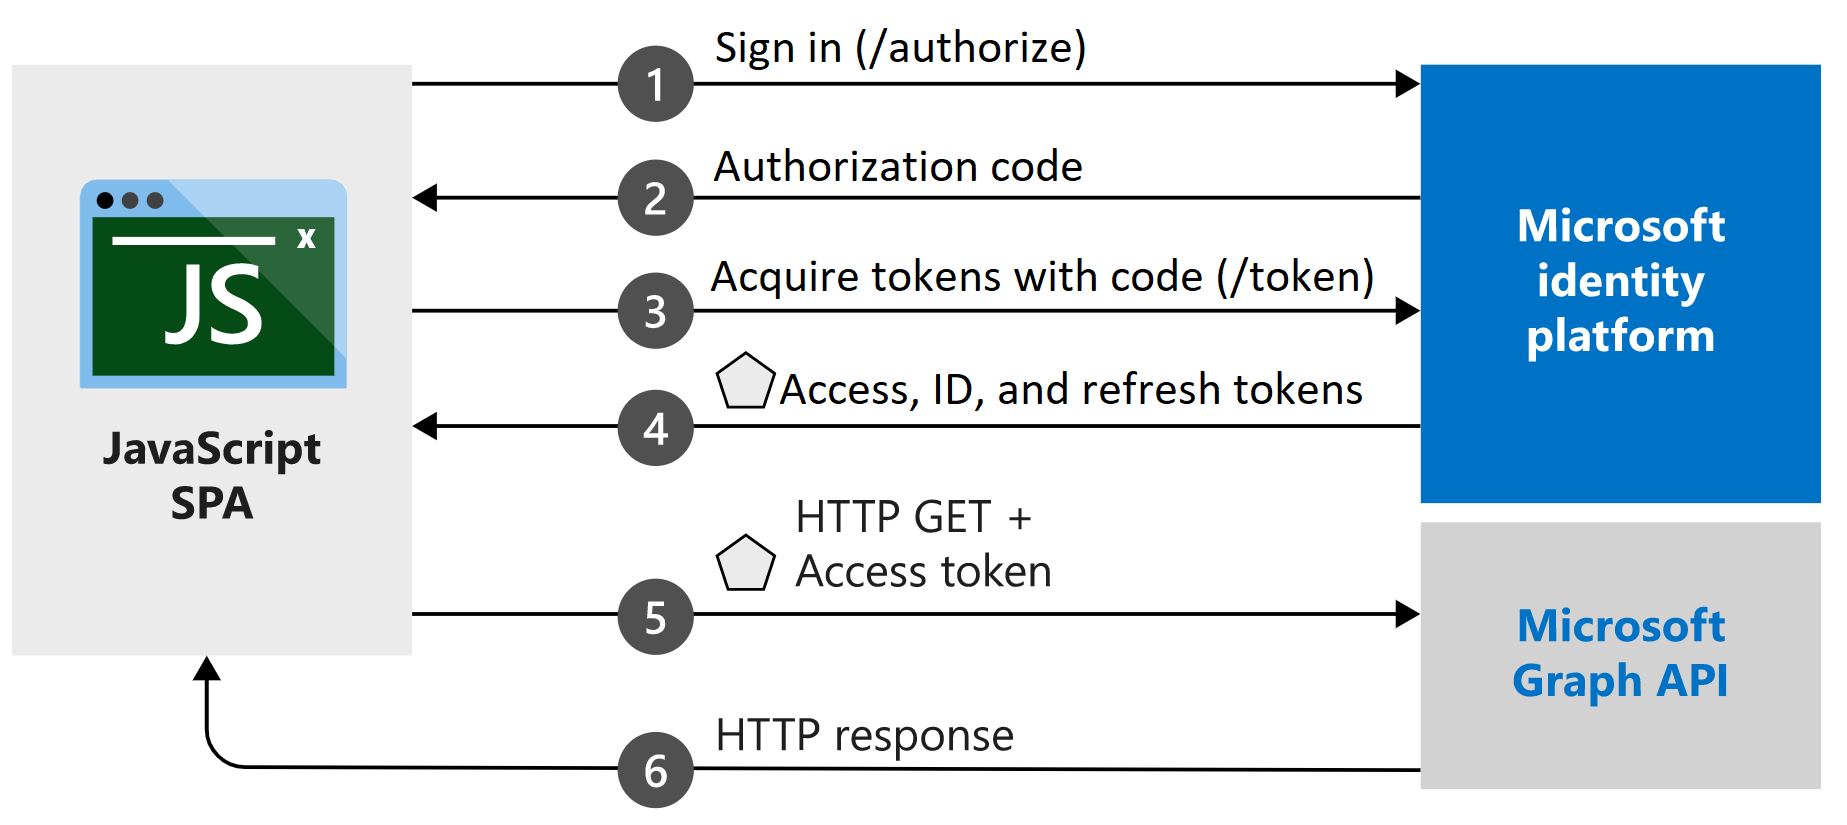
The sample application created in this tutorial enables an Angular SPA to query the Microsoft Graph API or a web API that accepts tokens issued by the Microsoft identity platform. It uses the Microsoft Authentication Library (MSAL) for Angular v2, a wrapper of the MSAL.js v2 library. MSAL Angular enables Angular 9+ applications to authenticate enterprise users by using Microsoft Entra ID, and also users with Microsoft accounts and social identities like Facebook, Google, and LinkedIn. The library also enables applications to get access to Microsoft cloud services and Microsoft Graph.
In this scenario, after a user signs in, an access token is requested and added to HTTP requests through the authorization header. Token acquisition and renewal are handled by MSAL.
Libraries
This tutorial uses the following libraries:
| Library | Description |
|---|---|
| MSAL Angular | Microsoft Authentication Library for JavaScript Angular Wrapper |
| MSAL Browser | Microsoft Authentication Library for JavaScript v2 browser package |
You can find the source code for all of the MSAL.js libraries in the microsoft-authentication-library-for-js repository on GitHub.
Get the completed code sample
Do you prefer to download the completed sample project for this tutorial instead? Clone the ms-identity-javascript-angular-spa
git clone https://github.com/Azure-Samples/ms-identity-javascript-angular-spa.git
To continue with the tutorial and build the application yourself, move on to the next section, Register the application and record identifiers.
Register the application and record identifiers
Tip
Steps in this article may vary slightly based on the portal you start from.
To complete registration, provide the application a name, specify the supported account types, and add a redirect URI. Once registered, the application Overview pane displays the identifiers needed in the application source code.
- Sign in to the Microsoft Entra admin center as at least an Application Developer.
- If access to multiple tenants is available, use the Directories + subscriptions filter
 in the top menu to switch to the tenant in which you want to register the application.
- Browse to Identity > Applications > App registrations.
- Select New registration.
- Enter a Name for the application, such as Angular-SPA-auth-code.
- For Supported account types, select Accounts in this organizational directory only. For information on different account types, select the Help me choose option.
- Under Redirect URI (optional), use the drop-down menu to select Single-page-application (SPA) and enter
http://localhost:4200into the text box. - Select Register.
- The application's Overview pane is displayed when registration is complete. Record the Directory (tenant) ID and the Application (client) ID to be used in your application source code.
Create your project
Open Visual Studio Code, select File > Open Folder.... Navigate to and select the location in which to create your project.
Open a new terminal by selecting Terminal > New Terminal.
- You may need to switch terminal types. Select the down arrow next to the + icon in the terminal and select Command Prompt.
Run the following commands to create a new Angular project with the name msal-angular-tutorial, install Angular Material component libraries, MSAL Browser, MSAL Angular and generate home and profile components.
npm install -g @angular/cli
ng new msal-angular-tutorial --routing=true --style=css --strict=false
cd msal-angular-tutorial
npm install @angular/material @angular/cdk
npm install @azure/msal-browser @azure/msal-angular
ng generate component home
ng generate component profile
Configure the application and edit the base UI
Open src/app/app.module.ts. The
MsalModuleandMsalInterceptorneed to be added toimportsalong with theisIEconstant. You'll also add the material modules. Replace the entire contents of the file with the following snippet:import { BrowserModule } from "@angular/platform-browser"; import { BrowserAnimationsModule } from "@angular/platform-browser/animations"; import { NgModule } from "@angular/core"; import { MatButtonModule } from "@angular/material/button"; import { MatToolbarModule } from "@angular/material/toolbar"; import { MatListModule } from "@angular/material/list"; import { AppRoutingModule } from "./app-routing.module"; import { AppComponent } from "./app.component"; import { HomeComponent } from "./home/home.component"; import { ProfileComponent } from "./profile/profile.component"; import { MsalModule, MsalRedirectComponent } from "@azure/msal-angular"; import { PublicClientApplication } from "@azure/msal-browser"; const isIE = window.navigator.userAgent.indexOf("MSIE ") > -1 || window.navigator.userAgent.indexOf("Trident/") > -1; @NgModule({ declarations: [AppComponent, HomeComponent, ProfileComponent], imports: [ BrowserModule, BrowserAnimationsModule, AppRoutingModule, MatButtonModule, MatToolbarModule, MatListModule, MsalModule.forRoot( new PublicClientApplication({ auth: { clientId: "Enter_the_Application_Id_here", // Application (client) ID from the app registration authority: "Enter_the_Cloud_Instance_Id_Here/Enter_the_Tenant_Info_Here", // The Azure cloud instance and the app's sign-in audience (tenant ID, common, organizations, or consumers) redirectUri: "Enter_the_Redirect_Uri_Here", // This is your redirect URI }, cache: { cacheLocation: "localStorage", storeAuthStateInCookie: isIE, // Set to true for Internet Explorer 11 }, }), null, null ), ], providers: [], bootstrap: [AppComponent, MsalRedirectComponent], }) export class AppModule {}Replace the following values with the values obtained from the Microsoft Entra admin center. For more information about available configurable options, see Initialize client applications.
clientId- The identifier of the application, also referred to as the client. ReplaceEnter_the_Application_Id_Herewith the Application (client) ID value that was recorded earlier from the overview page of the registered application.authority- This is composed of two parts:- The Instance is endpoint of the cloud provider. For the main or global Azure cloud, enter
https://login.microsoftonline.com. Check with the different available endpoints in National clouds. - The Tenant ID is the identifier of the tenant where the application is registered. Replace the
_Enter_the_Tenant_Info_Herewith the Directory (tenant) ID value that was recorded earlier from the overview page of the registered application.
- The Instance is endpoint of the cloud provider. For the main or global Azure cloud, enter
redirectUri- the location where the authorization server sends the user once the app has been successfully authorized and granted an authorization code or access token. ReplaceEnter_the_Redirect_Uri_Herewithhttp://localhost:4200.
Open src/app/app-routing.module.ts and add routes to the home and profile components. Replace the entire contents of the file with the following snippet:
import { NgModule } from "@angular/core";
import { Routes, RouterModule } from "@angular/router";
import { BrowserUtils } from "@azure/msal-browser";
import { HomeComponent } from "./home/home.component";
import { ProfileComponent } from "./profile/profile.component";

const routes: Routes = [
  {
    path: "profile",
    component: ProfileComponent,
  },
  {
    path: "",
    component: HomeComponent,
  },
];

const isIframe = window !== window.parent && !window.opener;

@NgModule({
  imports: [
    RouterModule.forRoot(routes, {
      // Don't perform initial navigation in iframes or popups
      initialNavigation:
        !BrowserUtils.isInIframe() && !BrowserUtils.isInPopup()
          ? "enabledNonBlocking"
          : "disabled", // Set to enabledBlocking to use Angular Universal
    }),
  ],
  exports: [RouterModule],
})
export class AppRoutingModule {}
Open src/app/app.component.html and replace the existing code with the following:
<mat-toolbar color="primary">
  <a class="title" href="/">{{ title }}</a>

  <div class="toolbar-spacer"></div>

  <a mat-button [routerLink]="['profile']">Profile</a>

  <button mat-raised-button *ngIf="!loginDisplay" (click)="login()">Login</button>

</mat-toolbar>
<div class="container">
  <!--This is to avoid reload during acquireTokenSilent() because of hidden iframe -->
  <router-outlet *ngIf="!isIframe"></router-outlet>
</div>
Open src/style.css to define the CSS:
@import "~@angular/material/prebuilt-themes/deeppurple-amber.css";

html,
body {
  height: 100%;
}
body {
  margin: 0;
  font-family: Roboto, "Helvetica Neue", sans-serif;
}
.container {
  margin: 1%;
}
Open src/app/app.component.css to add CSS styling to the application:
.toolbar-spacer {
  flex: 1 1 auto;
}

a.title {
  color: white;
}
Sign in using pop-ups
Open src/app/app.component.ts and replace the contents of the file to the following to sign in a user using a pop-up window:
import { MsalService } from '@azure/msal-angular';
import { Component, OnInit } from '@angular/core';

@Component({
  selector: 'app-root',
  templateUrl: './app.component.html',
  styleUrls: ['./app.component.css']
})
export class AppComponent implements OnInit {
  title = 'msal-angular-tutorial';
  isIframe = false;
  loginDisplay = false;

  constructor(private authService: MsalService) { }

  ngOnInit() {
    this.isIframe = window !== window.parent && !window.opener;
  }

  login() {
    this.authService.loginPopup()
      .subscribe({
        next: (result) => {
          console.log(result);
          this.setLoginDisplay();
        },
        error: (error) => console.log(error)
      });
  }

  setLoginDisplay() {
    this.loginDisplay = this.authService.instance.getAllAccounts().length > 0;
  }
}
Sign in using redirects
Update src/app/app.module.ts to bootstrap the
MsalRedirectComponent. This is a dedicated redirect component, which handles redirects. Change theMsalModuleimport andAppComponentbootstrap to resemble the following:... import { MsalModule, MsalRedirectComponent } from '@azure/msal-angular'; // Updated import ... bootstrap: [AppComponent, MsalRedirectComponent] // MsalRedirectComponent bootstrapped here ...Open src/index.html and replace the entire contents of the file with the following snippet, which adds the
<app-redirect>selector:<!doctype html> <html lang="en"> <head> <meta charset="utf-8"> <title>msal-angular-tutorial</title> <base href="/"> <meta name="viewport" content="width=device-width, initial-scale=1"> <link rel="icon" type="image/x-icon" href="favicon.ico"> </head> <body> <app-root></app-root> <app-redirect></app-redirect> </body> </html>Open src/app/app.component.ts and replace the code with the following to sign in a user using a full-frame redirect:
import { MsalService } from '@azure/msal-angular';
import { Component, OnInit } from '@angular/core';

@Component({
  selector: 'app-root',
  templateUrl: './app.component.html',
  styleUrls: ['./app.component.css']
})
export class AppComponent implements OnInit {
  title = 'msal-angular-tutorial';
  isIframe = false;
  loginDisplay = false;

  constructor(private authService: MsalService) { }

  ngOnInit() {
    this.isIframe = window !== window.parent && !window.opener;
  }

  login() {
    this.authService.loginRedirect();
  }

  setLoginDisplay() {
    this.loginDisplay = this.authService.instance.getAllAccounts().length > 0;
  }
}
Navigate to src/app/home/home.component.ts and replace the entire contents of the file with the following snippet to subscribe to the
LOGIN_SUCCESSevent:import { Component, OnInit } from '@angular/core'; import { MsalBroadcastService, MsalService } from '@azure/msal-angular'; import { EventMessage, EventType, InteractionStatus } from '@azure/msal-browser'; import { filter } from 'rxjs/operators'; @Component({ selector: 'app-home', templateUrl: './home.component.html', styleUrls: ['./home.component.css'] }) export class HomeComponent implements OnInit { constructor(private authService: MsalService, private msalBroadcastService: MsalBroadcastService) { } ngOnInit(): void { this.msalBroadcastService.msalSubject$ .pipe( filter((msg: EventMessage) => msg.eventType === EventType.LOGIN_SUCCESS), ) .subscribe((result: EventMessage) => { console.log(result); }); } }
Conditional rendering
In order to render certain User Interface (UI) only for authenticated users, components have to subscribe to the MsalBroadcastService to see if users have been signed in, and interaction has completed.
Add the
MsalBroadcastServiceto src/app/app.component.ts and subscribe to theinProgress$observable to check if interaction is complete and an account is signed in before rendering UI. Your code should now look like this:import { Component, OnInit, OnDestroy } from '@angular/core'; import { MsalService, MsalBroadcastService } from '@azure/msal-angular'; import { InteractionStatus } from '@azure/msal-browser'; import { Subject } from 'rxjs'; import { filter, takeUntil } from 'rxjs/operators'; @Component({ selector: 'app-root', templateUrl: './app.component.html', styleUrls: ['./app.component.css'] }) export class AppComponent implements OnInit, OnDestroy { title = 'msal-angular-tutorial'; isIframe = false; loginDisplay = false; private readonly _destroying$ = new Subject<void>(); constructor(private broadcastService: MsalBroadcastService, private authService: MsalService) { } ngOnInit() { this.isIframe = window !== window.parent && !window.opener; this.broadcastService.inProgress$ .pipe( filter((status: InteractionStatus) => status === InteractionStatus.None), takeUntil(this._destroying$) ) .subscribe(() => { this.setLoginDisplay(); }) } login() { this.authService.loginRedirect(); } setLoginDisplay() { this.loginDisplay = this.authService.instance.getAllAccounts().length > 0; } ngOnDestroy(): void { this._destroying$.next(undefined); this._destroying$.complete(); } }Update the code in src/app/home/home.component.ts to also check for interaction to be completed before updating UI. Your code should now look like this:
import { Component, OnInit } from '@angular/core';
import { MsalBroadcastService, MsalService } from '@azure/msal-angular';
import { EventMessage, EventType, InteractionStatus } from '@azure/msal-browser';
import { filter } from 'rxjs/operators';

@Component({
  selector: 'app-home',
  templateUrl: './home.component.html',
  styleUrls: ['./home.component.css']
})
export class HomeComponent implements OnInit {
  loginDisplay = false;

  constructor(private authService: MsalService, private msalBroadcastService: MsalBroadcastService) { }

  ngOnInit(): void {
    this.msalBroadcastService.msalSubject$
      .pipe(
        filter((msg: EventMessage) => msg.eventType === EventType.LOGIN_SUCCESS),
      )
      .subscribe((result: EventMessage) => {
        console.log(result);
      });

    this.msalBroadcastService.inProgress$
      .pipe(
        filter((status: InteractionStatus) => status === InteractionStatus.None)
      )
      .subscribe(() => {
        this.setLoginDisplay();
      })
  }

  setLoginDisplay() {
    this.loginDisplay = this.authService.instance.getAllAccounts().length > 0;
  }
}
Replace the code in src/app/home/home.component.html with the following conditional displays:
<div *ngIf="!loginDisplay">
    <p>Please sign-in to see your profile information.</p>
</div>

<div *ngIf="loginDisplay">
    <p>Login successful!</p>
    <p>Request your profile information by clicking Profile above.</p>
</div>
Implement Angular Guard
The MsalGuard class is one you can use to protect routes and require authentication before accessing the protected route. The following steps add the MsalGuard to the Profile route. Protecting the Profile route means that even if a user doesn't sign in using the Login button, if they try to access the Profile route or select the Profile button, the MsalGuard prompts the user to authenticate via pop-up or redirect before showing the Profile page.
MsalGuard is a convenience class you can use to improve the user experience, but it shouldn't be relied upon for security. Attackers can potentially get around client-side guards, and you should ensure that the server doesn't return any data the user shouldn't access.
Add the
MsalGuardclass as a provider in your application in src/app/app.module.ts, and add the configurations for theMsalGuard. Scopes needed for acquiring tokens later can be provided in theauthRequest, and the type of interaction for the Guard can be set toRedirectorPopup. Your code should look like the following:import { BrowserModule } from "@angular/platform-browser"; import { BrowserAnimationsModule } from "@angular/platform-browser/animations"; import { NgModule } from "@angular/core"; import { MatButtonModule } from "@angular/material/button"; import { MatToolbarModule } from "@angular/material/toolbar"; import { MatListModule } from "@angular/material/list"; import { AppRoutingModule } from "./app-routing.module"; import { AppComponent } from "./app.component"; import { HomeComponent } from "./home/home.component"; import { ProfileComponent } from "./profile/profile.component"; import { MsalModule, MsalRedirectComponent, MsalGuard, } from "@azure/msal-angular"; // MsalGuard added to imports import { PublicClientApplication, InteractionType, } from "@azure/msal-browser"; // InteractionType added to imports const isIE = window.navigator.userAgent.indexOf("MSIE ") > -1 || window.navigator.userAgent.indexOf("Trident/") > -1; @NgModule({ declarations: [AppComponent, HomeComponent, ProfileComponent], imports: [ BrowserModule, BrowserAnimationsModule, AppRoutingModule, MatButtonModule, MatToolbarModule, MatListModule, MsalModule.forRoot( new PublicClientApplication({ auth: { clientId: "Enter_the_Application_Id_here", authority: "Enter_the_Cloud_Instance_Id_Here/Enter_the_Tenant_Info_Here", redirectUri: "Enter_the_Redirect_Uri_Here", }, cache: { cacheLocation: "localStorage", storeAuthStateInCookie: isIE, }, }), { interactionType: InteractionType.Redirect, // MSAL Guard Configuration authRequest: { scopes: ["user.read"], }, }, null ), ], providers: [ MsalGuard, // MsalGuard added as provider here ], bootstrap: [AppComponent, MsalRedirectComponent], }) export class AppModule {}Set the
MsalGuardon the routes you wish to protect in src/app/app-routing.module.ts:import { NgModule } from "@angular/core"; import { Routes, RouterModule } from "@angular/router"; import { HomeComponent } from "./home/home.component"; import { ProfileComponent } from "./profile/profile.component"; import { MsalGuard } from "@azure/msal-angular"; const routes: Routes = [ { path: "profile", component: ProfileComponent, canActivate: [MsalGuard], }, { path: "", component: HomeComponent, }, ]; const isIframe = window !== window.parent && !window.opener; @NgModule({ imports: [ RouterModule.forRoot(routes, { // Don't perform initial navigation in iframes or popups initialNavigation: !BrowserUtils.isInIframe() && !BrowserUtils.isInPopup() ? "enabledNonBlocking" : "disabled", // Set to enabledBlocking to use Angular Universal }), ], exports: [RouterModule], }) export class AppRoutingModule {}Adjust the login calls in src/app/app.component.ts to take the
authRequestset in the guard configurations into account. Your code should now look like the following:import { Component, OnInit, OnDestroy, Inject } from '@angular/core'; import { MsalService, MsalBroadcastService, MSAL_GUARD_CONFIG, MsalGuardConfiguration } from '@azure/msal-angular'; import { InteractionStatus, RedirectRequest } from '@azure/msal-browser'; import { Subject } from 'rxjs'; import { filter, takeUntil } from 'rxjs/operators'; @Component({ selector: 'app-root', templateUrl: './app.component.html', styleUrls: ['./app.component.css'] }) export class AppComponent implements OnInit, OnDestroy { title = 'msal-angular-tutorial'; isIframe = false; loginDisplay = false; private readonly _destroying$ = new Subject<void>(); constructor(@Inject(MSAL_GUARD_CONFIG) private msalGuardConfig: MsalGuardConfiguration, private broadcastService: MsalBroadcastService, private authService: MsalService) { } ngOnInit() { this.isIframe = window !== window.parent && !window.opener; this.broadcastService.inProgress$ .pipe( filter((status: InteractionStatus) => status === InteractionStatus.None), takeUntil(this._destroying$) ) .subscribe(() => { this.setLoginDisplay(); }) } login() { if (this.msalGuardConfig.authRequest){ this.authService.loginRedirect({...this.msalGuardConfig.authRequest} as RedirectRequest); } else { this.authService.loginRedirect(); } } setLoginDisplay() { this.loginDisplay = this.authService.instance.getAllAccounts().length > 0; } ngOnDestroy(): void { this._destroying$.next(undefined); this._destroying$.complete(); } }
Acquire a token
Angular Interceptor
MSAL Angular provides an Interceptor class that automatically acquires tokens for outgoing requests that use the Angular http client to known protected resources.
Add the
Interceptorclass as a provider to your application in src/app/app.module.ts, with its configurations. Your code should now look like the following:import { BrowserModule } from "@angular/platform-browser"; import { BrowserAnimationsModule } from "@angular/platform-browser/animations"; import { NgModule } from "@angular/core"; import { HTTP_INTERCEPTORS, HttpClientModule } from "@angular/common/http"; // Import import { MatButtonModule } from "@angular/material/button"; import { MatToolbarModule } from "@angular/material/toolbar"; import { MatListModule } from "@angular/material/list"; import { AppRoutingModule } from "./app-routing.module"; import { AppComponent } from "./app.component"; import { HomeComponent } from "./home/home.component"; import { ProfileComponent } from "./profile/profile.component"; import { MsalModule, MsalRedirectComponent, MsalGuard, MsalInterceptor, } from "@azure/msal-angular"; // Import MsalInterceptor import { InteractionType, PublicClientApplication, } from "@azure/msal-browser"; const isIE = window.navigator.userAgent.indexOf("MSIE ") > -1 || window.navigator.userAgent.indexOf("Trident/") > -1; @NgModule({ declarations: [AppComponent, HomeComponent, ProfileComponent], imports: [ BrowserModule, BrowserAnimationsModule, AppRoutingModule, MatButtonModule, MatToolbarModule, MatListModule, HttpClientModule, MsalModule.forRoot( new PublicClientApplication({ auth: { clientId: "Enter_the_Application_Id_Here", authority: "Enter_the_Cloud_Instance_Id_Here/Enter_the_Tenant_Info_Here", redirectUri: "Enter_the_Redirect_Uri_Here", }, cache: { cacheLocation: "localStorage", storeAuthStateInCookie: isIE, }, }), { interactionType: InteractionType.Redirect, authRequest: { scopes: ["user.read"], }, }, { interactionType: InteractionType.Redirect, // MSAL Interceptor Configuration protectedResourceMap: new Map([ ["Enter_the_Graph_Endpoint_Here/v1.0/me", ["user.read"]], ]), } ), ], providers: [ { provide: HTTP_INTERCEPTORS, useClass: MsalInterceptor, multi: true, }, MsalGuard, ], bootstrap: [AppComponent, MsalRedirectComponent], }) export class AppModule {}The protected resources are provided as a
protectedResourceMap. The URLs you provide in theprotectedResourceMapcollection are case-sensitive. For each resource, add scopes being requested to be returned in the access token.For example:
["user.read"]for Microsoft Graph["<Application ID URL>/scope"]for custom web APIs (that is,api://<Application ID>/access_as_user)
Modify the values in the
protectedResourceMapas described here:Enter_the_Graph_Endpoint_Hereis the instance of the Microsoft Graph API the application should communicate with. For the global Microsoft Graph API endpoint, replace this string withhttps://graph.microsoft.com. For endpoints in national cloud deployments, see National cloud deployments in the Microsoft Graph documentation.
Replace the code in src/app/profile/profile.component.ts to retrieve a user's profile with an HTTP request, and replace the
GRAPH_ENDPOINTwith the Microsoft Graph endpoint:import { Component, OnInit } from '@angular/core'; import { HttpClient } from '@angular/common/http'; const GRAPH_ENDPOINT = 'Enter_the_Graph_Endpoint_Here/v1.0/me'; type ProfileType = { givenName?: string, surname?: string, userPrincipalName?: string, id?: string }; @Component({ selector: 'app-profile', templateUrl: './profile.component.html', styleUrls: ['./profile.component.css'] }) export class ProfileComponent implements OnInit { profile!: ProfileType; constructor( private http: HttpClient ) { } ngOnInit() { this.getProfile(); } getProfile() { this.http.get(GRAPH_ENDPOINT) .subscribe(profile => { this.profile = profile; }); } }Replace the UI in src/app/profile/profile.component.html to display profile information:
<div>
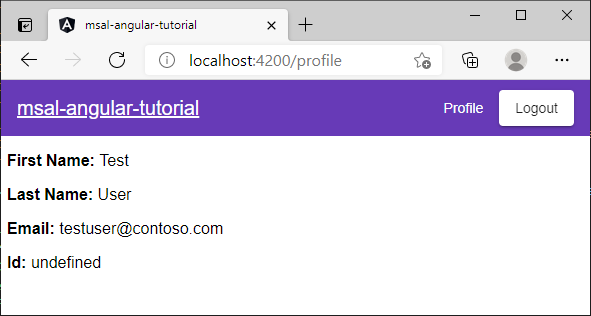
    <p><strong>First Name: </strong> {{profile?.givenName}}</p>
    <p><strong>Last Name: </strong> {{profile?.surname}}</p>
    <p><strong>Email: </strong> {{profile?.userPrincipalName}}</p>
    <p><strong>Id: </strong> {{profile?.id}}</p>
</div>
Sign out
Update the code in src/app/app.component.html to conditionally display a
Logoutbutton:<mat-toolbar color="primary"> <a class="title" href="/">{{ title }}</a> <div class="toolbar-spacer"></div> <a mat-button [routerLink]="['profile']">Profile</a> <button mat-raised-button *ngIf="!loginDisplay" (click)="login()">Login</button> <button mat-raised-button *ngIf="loginDisplay" (click)="logout()">Logout</button> </mat-toolbar> <div class="container"> <!--This is to avoid reload during acquireTokenSilent() because of hidden iframe --> <router-outlet *ngIf="!isIframe"></router-outlet> </div>
Sign out using redirects
Update the code in src/app/app.component.ts to sign out a user using redirects:
import { Component, OnInit, OnDestroy, Inject } from '@angular/core';
import { MsalService, MsalBroadcastService, MSAL_GUARD_CONFIG, MsalGuardConfiguration } from '@azure/msal-angular';
import { InteractionStatus, RedirectRequest } from '@azure/msal-browser';
import { Subject } from 'rxjs';
import { filter, takeUntil } from 'rxjs/operators';

@Component({
  selector: 'app-root',
  templateUrl: './app.component.html',
  styleUrls: ['./app.component.css']
})
export class AppComponent implements OnInit, OnDestroy {
  title = 'msal-angular-tutorial';
  isIframe = false;
  loginDisplay = false;
  private readonly _destroying$ = new Subject<void>();

  constructor(@Inject(MSAL_GUARD_CONFIG) private msalGuardConfig: MsalGuardConfiguration, private broadcastService: MsalBroadcastService, private authService: MsalService) { }

  ngOnInit() {
    this.isIframe = window !== window.parent && !window.opener;

    this.broadcastService.inProgress$
    .pipe(
      filter((status: InteractionStatus) => status === InteractionStatus.None),
      takeUntil(this._destroying$)
    )
    .subscribe(() => {
      this.setLoginDisplay();
    })
  }

  login() {
    if (this.msalGuardConfig.authRequest){
      this.authService.loginRedirect({...this.msalGuardConfig.authRequest} as RedirectRequest);
    } else {
      this.authService.loginRedirect();
    }
  }

  logout() { // Add log out function here
    this.authService.logoutRedirect({
      postLogoutRedirectUri: 'http://localhost:4200'
    });
  }

  setLoginDisplay() {
    this.loginDisplay = this.authService.instance.getAllAccounts().length > 0;
  }

  ngOnDestroy(): void {
    this._destroying$.next(undefined);
    this._destroying$.complete();
  }
}
Sign out using pop-ups
Update the code in src/app/app.component.ts to sign out a user using pop-ups:
import { Component, OnInit, OnDestroy, Inject } from '@angular/core';
import { MsalService, MsalBroadcastService, MSAL_GUARD_CONFIG, MsalGuardConfiguration } from '@azure/msal-angular';
import { InteractionStatus, PopupRequest } from '@azure/msal-browser';
import { Subject } from 'rxjs';
import { filter, takeUntil } from 'rxjs/operators';

@Component({
  selector: 'app-root',
  templateUrl: './app.component.html',
  styleUrls: ['./app.component.css']
})
export class AppComponent implements OnInit, OnDestroy {
  title = 'msal-angular-tutorial';
  isIframe = false;
  loginDisplay = false;
  private readonly _destroying$ = new Subject<void>();

  constructor(@Inject(MSAL_GUARD_CONFIG) private msalGuardConfig: MsalGuardConfiguration, private broadcastService: MsalBroadcastService, private authService: MsalService) { }

  ngOnInit() {
    this.isIframe = window !== window.parent && !window.opener;

    this.broadcastService.inProgress$
    .pipe(
      filter((status: InteractionStatus) => status === InteractionStatus.None),
      takeUntil(this._destroying$)
    )
    .subscribe(() => {
      this.setLoginDisplay();
    })
  }

  login() {
    if (this.msalGuardConfig.authRequest){
      this.authService.loginPopup({...this.msalGuardConfig.authRequest} as PopupRequest)
        .subscribe({
          next: (result) => {
            console.log(result);
            this.setLoginDisplay();
          },
          error: (error) => console.log(error)
        });
    } else {
      this.authService.loginPopup()
        .subscribe({
          next: (result) => {
            console.log(result);
            this.setLoginDisplay();
          },
          error: (error) => console.log(error)
        });
    }
  }

  logout() { // Add log out function here
    this.authService.logoutPopup({
      mainWindowRedirectUri: "/"
    });
  }

  setLoginDisplay() {
    this.loginDisplay = this.authService.instance.getAllAccounts().length > 0;
  }

  ngOnDestroy(): void {
    this._destroying$.next(undefined);
    this._destroying$.complete();
  }
}
Test your code
Start the web server to listen to the port by running the following commands at a command-line prompt from the application folder:
npm install
npm start
In your browser, enter
http://localhost:4200, and you should see a page that looks like the following.
Select Accept to grant the app permissions to your profile. This will happen the first time that you start to sign in.

After consenting, the following If you consent to the requested permissions, the web application shows a successful login page.
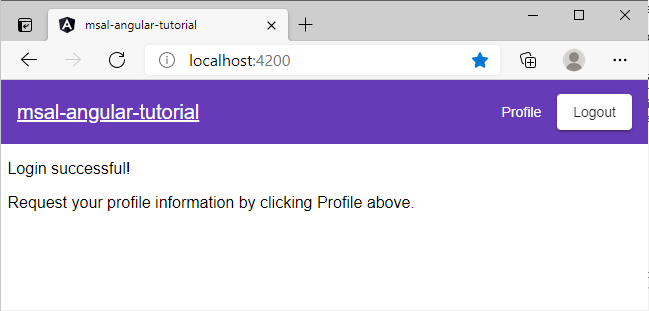
Select Profile to view the user profile information returned in the response from the call to the Microsoft Graph API:
Add scopes and delegated permissions
The Microsoft Graph API requires the User.Read scope to read a user's profile. The User.Read scope is added automatically to every app registration. Other APIs for Microsoft Graph, and custom APIs for your back-end server, might require other scopes. For example, the Microsoft Graph API requires the Mail.Read scope in order to list the user's email.
As you add scopes, your users might be prompted to provide extra consent for the added scopes.
Note
The user might be prompted for additional consents as you increase the number of scopes.
Help and support
If you need help, want to report an issue, or want to learn about your support options, see Help and support for developers.
Next steps
Delve deeper into single-page application (SPA) development on the Microsoft identity platform in our multi-part article series.
Feedback
Submit and view feedback for